优化体积
webpack-bundle-analyzer
介绍:
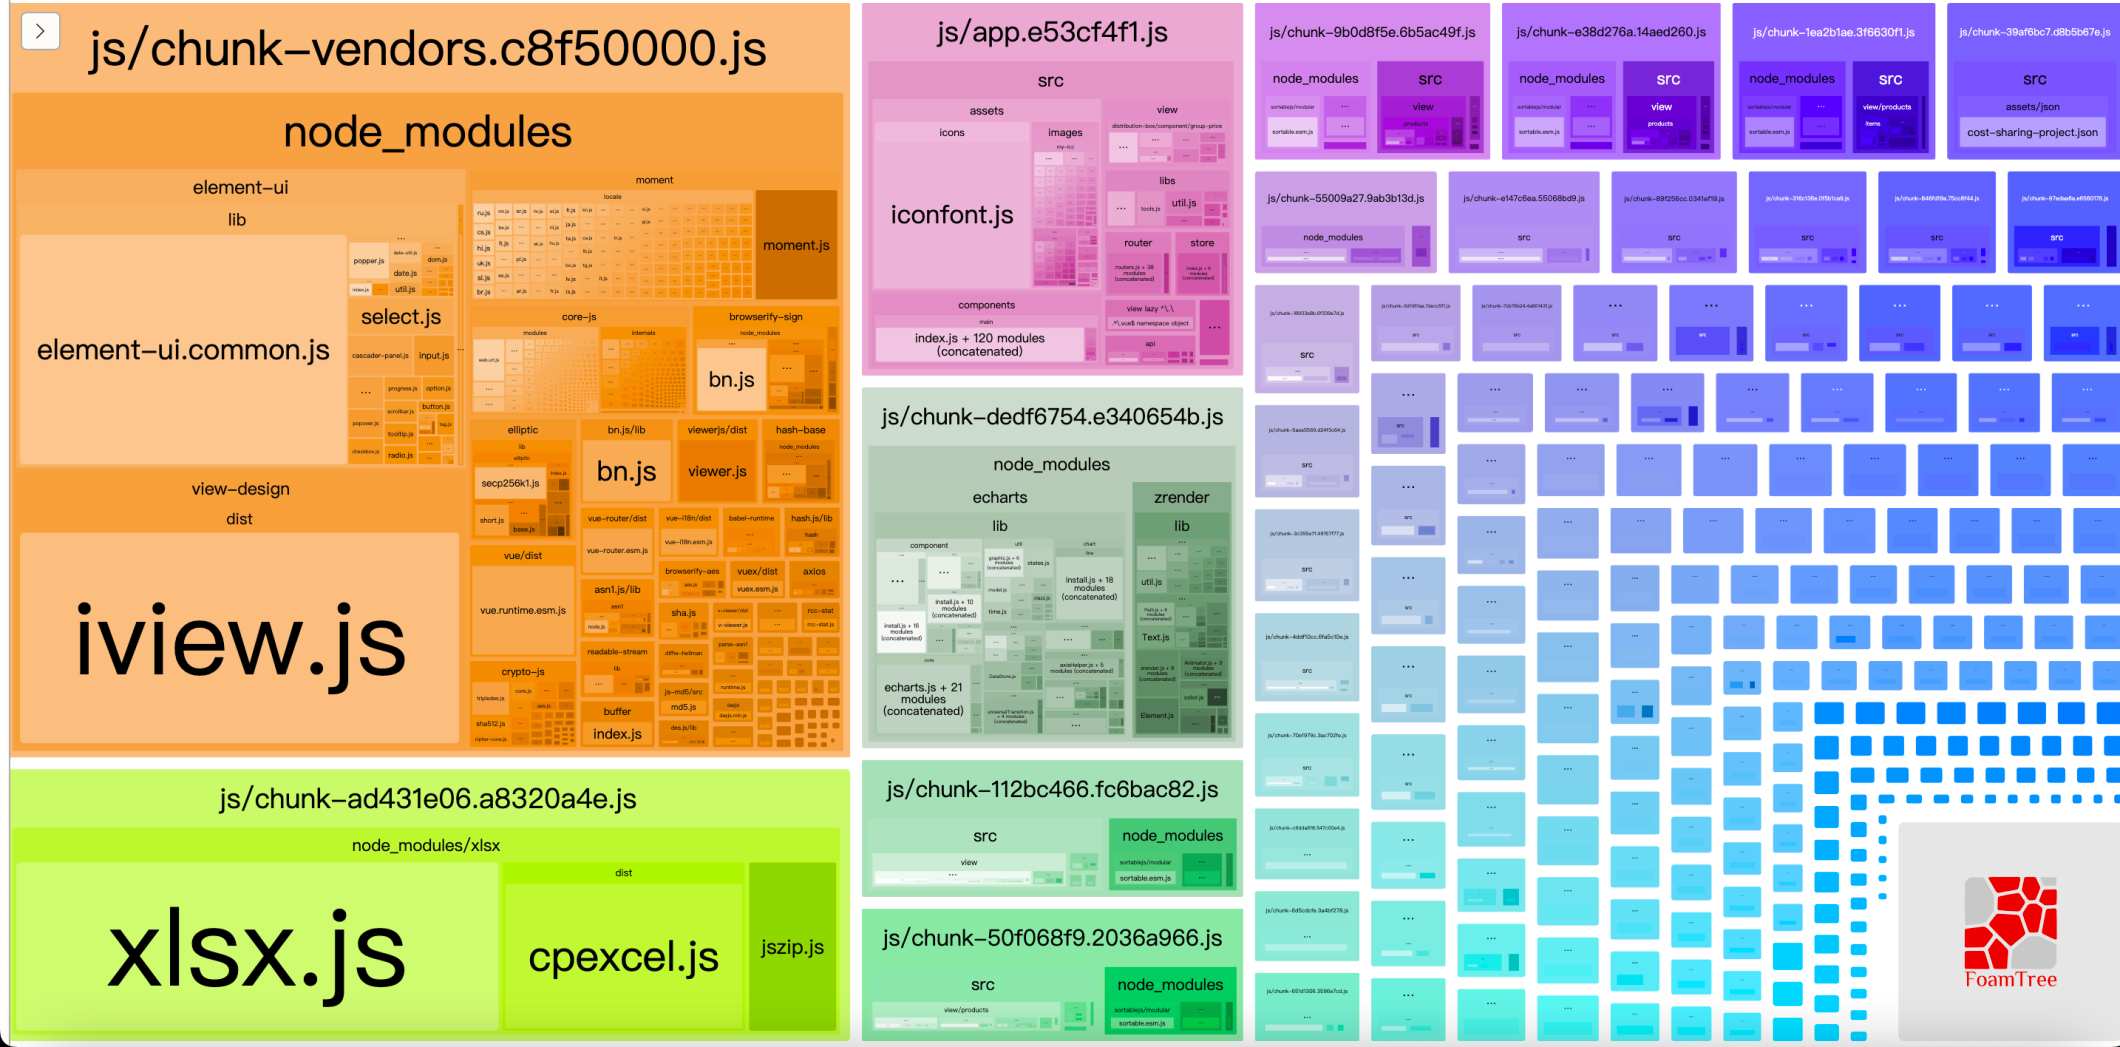
webpack-bundle-analyzer 用来分析 webapck 构建打包后的文件,如分包情况,占用体积等参数的分析。
使用方式:
# NPM
npm install --save-dev webpack-bundle-analyzer
# Yarn
yarn add -D webpack-bundle-analyzer
module.exports = {
  chainWebpack: config => {
    ...
    // 配置 打包分析
    config.plugin('webpack-bundle-analyzer').use(require('webpack-bundle-analyzer').BundleAnalyzerPlugin)
  },
  ...
}
在 vue-cli 中有 report 命令可以直接调用,然后去 dist 打包目录打开 report.html。
vue-cli-service build --report
vue-cli-service build --report-json
效果: 
terser-webpack-plugin 删除 console 注释(不建议)
介绍:
使用方式:
# npm
npm install terser-webpack-plugin --save-dev
# yarn
yarn add -D terser-webpack-plugin
const TerserPlugin = require('terser-webpack-plugin')

module.exports = {
  configureWebpack: {
    plugins: [
      new TerserPlugin({
        terserOptions: {
          warnings: false,
          compress: {
            drop_debugger: true, // console
            drop_console: true,
            pure_funcs: ['console.log'] // 移除console
          }
        }
      })
    ],
  ...
}
会拖慢 webpack 的编译速度,建议开发环境时关闭,生产环境再将其打开。 更建议规范团队成员的代码上去解决。
terser-webpack-plugin 多线程压缩 js
使用方式:
vue-cli3 默认的 webpack 有此优化,所以不多做说明。
externals & cdn
介绍:
externals 配置选项提供了「从输出的 bundle 中排除依赖」的方法。防止将某些 import 的包 (package) 打包到 bundle 中,而是在运行时 (runtime) 再去从外部获取这些扩展依赖(external dependencies)。
这个属性很好理解,而且使用起来也非常方便,非常的 nice! 最简单的方法是配置名称,当然你也可以编写一些复杂的配置官方文档
使用方式:
...
configureWebpack:{
    externals: {
    'vue': 'Vue',
    'vue-router': 'VueRouter',
    'view-design': 'iview'
  },
}
// 然后在 index.html 手动cdn引入(或者用插件自动添加)
CDN 方式目前还未试过,但是网上教程也很多,就不多做说明了,可以看下这个教程:
splitChunks 分割代码
介绍:
- chunks: 表示哪些代码需要优化,有三个可选值:initial(初始块)、async(按需加载块)、all(全部块),默认为 async
- minSize: 表示在压缩前的最小模块大小,默认为 30000
- minChunks: 表示被引用次数,默认为 1
- maxAsyncRequests: 按需加载时候最大的并行请求数,默认为 5
- maxInitialRequests: 一个入口最大的并行请求数,默认为 3
- automaticNameDelimiter: 命名连接符
- name: 拆分出来块的名字,默认由块名和 hash 值自动生成
- cacheGroups: 缓存组。缓存组的属性除上面所有属性外,还有 test, priority, reuseExistingChunk
- test: 用于控制哪些模块被这个缓存组匹配到
- priority: 缓存组打包的先后优先级
- reuseExistingChunk: 如果当前代码块包含的模块已经有了,就不在产生一个新的代码块
使用方式:
...
configureWebpack: {
// 代码拆包, https://webpack.docschina.org/plugins/split-chunks-plugin/
optimization: {
splitChunks: {
  cacheGroups: {
    xlsx: { // iview
      chunks: 'all',
      test: /[\\/]node_modules[\\/]xlsx[\\/]/,
      name: 'xlsx',
      minChunks: 1, // 在分割之前,这个代码块最小应该被引用的次数
      maxInitialRequests: 10,
      minSize: 0, // 大于0个字节
      priority: 120 // 权重
    },
    moment: {
      chunks: 'all',
      test: /[\\/]node_modules[\\/]moment[\\/]/,
      name: 'moment',
      minChunks: 1, // 在分割之前,这个代码块最小应该被引用的次数
      maxInitialRequests: 10,
      minSize: 0, // 大于0个字节
      priority: 110 // 权重
    },
    iview: { // iview
      chunks: 'all',
      test: /[\\/]node_modules[\\/]view-design[\\/]/,
      name: 'iview',
      minChunks: 1, // 在分割之前,这个代码块最小应该被引用的次数
      maxInitialRequests: 10,
      minSize: 0, // 大于0个字节
      priority: 100 // 权重
    },
    vendor: { // 其他第三方库抽离
      chunks: 'all',
      test: /[\\/]node_modules[\\/]/,
      name: 'vendor',
      minChunks: 1, // 在分割之前,这个代码块最小应该被引用的次数
      maxInitialRequests: 10,
      minSize: 0, // 大于0个字节
      priority: 90 // 权重
    },
    common: { // 公用模块抽离
      chunks: 'all',
      test: /[\\/]src[\\/](.*)[\\.]js/,
      name: 'common',
      minChunks: 1, // 在分割之前,这个代码块最小应该被引用的次数
      maxInitialRequests: 10,
      minSize: 0, // 大于0个字节
      priority: 80 // 权重
    },
    runtimeChunk: {
      name: 'manifest'
    }
  }
}
}
}
已知问题:
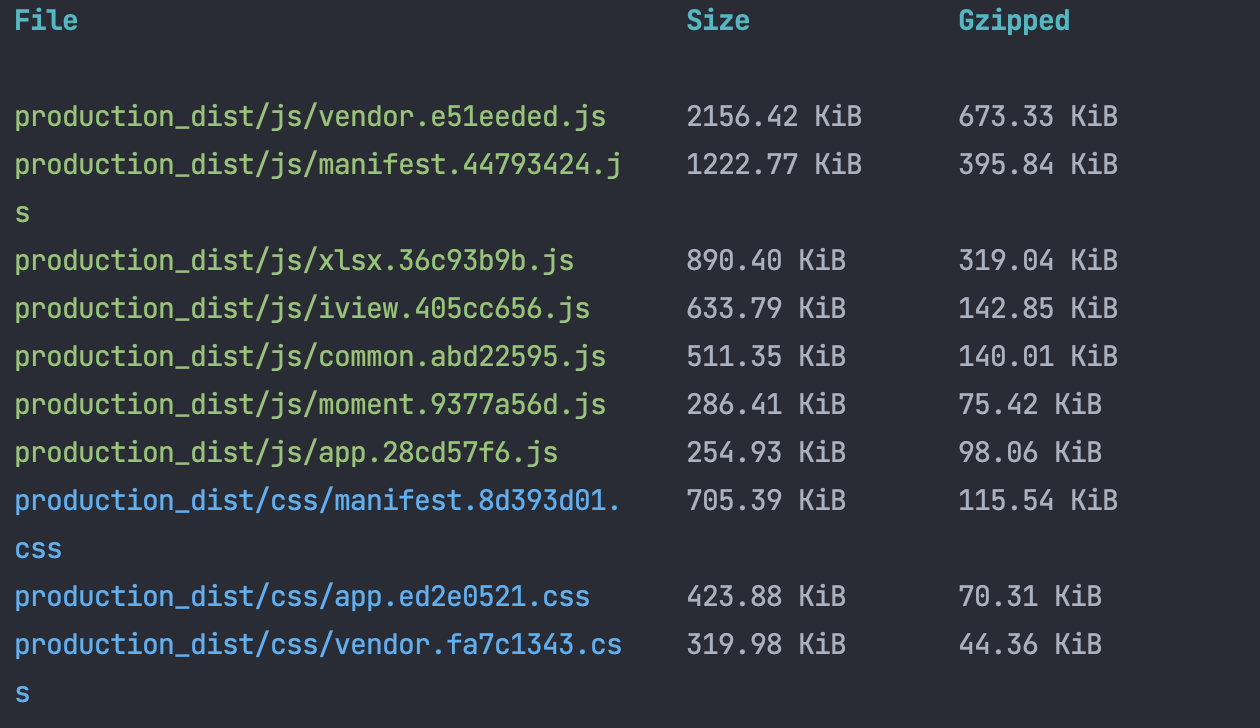
目前 icc-iview 中有很多样式文件是通过 import '../../assets/css/newLogin.less' 引入的, 通过拆包打包后,css 也会拆分为对应的文件,就会导致有些样式会被覆盖。效果:

compression-webpack-plugin gzip 打包
使用方式:
# npm
npm install compression-webpack-plugin --save-dev
# yarn
yarn add -D compression-webpack-plugin
const CompressionWebpackPlugin = require('compression-webpack-plugin')
const productionGzipExtensions = ['js', 'css']

module.exports = {
  configureWebpack: {
    plugins: [
      new CompressionWebpackPlugin({
        algorithm: 'gzip',
        test: new RegExp(`\\.(${productionGzipExtensions.join('|')})$`),
        threshold: 10240,
        minRatio: 0.8
      }),
    ],
  ...
}
效果:
babel-plugin-import 按需引入
使用方式:
以 iview 为例,首先安装,并在文件 .babelrc 中配置:
# npm
npm install babel-plugin-import --save-dev
# yarn
npm add -D babel-plugin-import
{
  "plugins": [["import", {
    "libraryName": "view-design",
    "libraryDirectory": "src/components"
  }]]
}
然后这样按需引入组件,就可以减小体积了:
import { Button, Table } from 'view-design';
Vue.component('Button', Button);
Vue.component('Table', Table);
特别提醒
按需引用仍然需要导入样式,即在 main.js 或根组件执行 import 'view-design/dist/styles/iview.css';
lodash 也一定要按需引入!!!
优化速度
hard-source-webpack-plugin 加缓存(开发模式启动速度优化)
介绍:
在启动项目时会针对项目生成缓存,若是项目无 package 或其他变化,下次就不用花费时间重新构建,直接复用缓存。
使用方式:
# npm
npm install hard-source-webpack-plugin --save-dev
# yarn
npm add -D hard-source-webpack-plugin
const HardSourceWebpackPlugin = require('hard-source-webpack-plugin')

module.exports = {
  configureWebpack: {
    plugins: [
      // 为模块提供中间缓存,缓存路径是:node_modules/.cache/hard-source
      // solve Configuration changes are not being detected
      new HardSourceWebpackPlugin({
        root: process.cwd(),
        directories: [],
        environmentHash: {
          root: process.cwd(),
          directories: [],
          // 配置了files的主要原因是解决配置更新,cache不生效了的问题,配置后有包的变化,plugin会重新构建一部分cache
          files: ['package.json', 'yarn.lock']
        }
      })
    ],
  ...
}
缩小文件检索解析范围
介绍:
- 为避免无用的检索与递归遍历,可以使用 alias 指定引用时候的模块。
- noParse,对不依赖本地代码的第三方依赖不进行解析。
使用方式:
const path = require('path')
const resolve = dir => {
return path.join(__dirname, dir)
}
module.exports = {
…
chainWebpack: config => {
config.resolve.alias
  .set('@', resolve('src')) // key,value自行定义,比如.set('@@', resolve('src/components'))
  .set('_c', resolve('src/components'))
  .set('_a', resolve('src/api'))
},
…
configureWebpack: {
module: {
  noParse: /^(vu|vue-router|vuex|vuex-router-sync|lodash|echarts|axios|view-design)$/
}
}
}
### 删除 prefetch、preload
#### 介绍:
> Resource Hint,辅助浏览器用来做资源优化的 指令

#### 使用方式:
module.exports = {
…
chainWebpack: config => {
config.plugins.delete('prefetch')
config.plugins.delete('preload')
},
…
}
这个要看项目具体情况使用。
### 多线程打包
从Vue-cli官方文档中,注意到parallel这个[配置](https://cli.vuejs.org/zh/config/#parallel)有如下说明。
> 是否为 Babel 或 TypeScript 使用 thread-loader。该选项在系统的 CPU 有多于一个内核时自动启用,仅作用于生产构建。

由此可见,网上很多教程中的多线程打包插件[HappyPack](https://github.com/amireh/happypack)也不需要了。

## 远程打包扩展
### 单独的config文件
#### 介绍:
远程组件使用单独的webpack配置文件,这样可以单独做一些优化,而且不会影响到整个项目的打包。
#### 使用方式
打包远程组件时,环境变量中增加VUE_CLI_SERVICE_CONFIG_PATH,值为新的配置文件路径。
### 使用js脚本批量打包远程组件
#### 介绍:
如果我们项目中需要打包的远程组件有很多,则可以考虑写一个js脚本来批量执行打包命令,而不是一直在package.json中的scripts中一直增加命令。
#### 用法:

1. 新增build-library.js
const {spawnSync} = require('child_process')
const chalk = require('chalk')
const path = require('path')
// 远程组件,增加远程组件修改这里即可
const LIBRARY_ARRAY = [
{
name: 'party',
path: './src/components/cut-in-tuoxuan/party.js'
},
{
name: 'compare',
path: './src/components/compare-price/compare.js'
},
{
name: 'iccLogin', // 登录
path: './src/view/login/login.js',
inlineVue: true
}
]
// 获取环境参数
const args = process.argv.splice(2)
const env = args.length > 0 ? args[0] : 'production'
console.log(chalk.green(The current environment is ${env}\n\n))
// 打包组件为 library
const buildLibrary = (libraryArray) => {
for (const library of libraryArray) {
const name = library.name
const dest = library.dest || 'production_dist/'
const target = library.target || 'lib'
const scriptPath = library.path
const inlineVue = library.inlineVue
console.log(chalk.blue(`Component ${env} ${name} start bundle\n`))

const cmd = `vue-cli-service build --target ${target} ${inlineVue ? '--inline-vue' : ''} --no-clean --dest ${dest} --mode ${env} --name ${name} ${scriptPath}`
console.log(chalk.blue(`$ ${cmd}\n`))
console.log(chalk.yellow(`bundle the component ${env} ${name} ...\n`))

const spawn = spawnSync(cmd, {
  shell: true,
  env: {
    ...process.env, // 要记得导入原本的环境变量
    VUE_CLI_SERVICE_CONFIG_PATH: path.resolve(__dirname, 'library.config.js') // 这里就是使用了单独的webpack配置文件
  },
  stdio: 'inherit'
})

if (spawn.status !== 0) {
  console.log(chalk.red(`Component ${env} ${name} is bundle failed.\n\n\n`))
  process.exit(spawn.status)
} else {
  console.log(chalk.green(`Component ${env} ${name} is bundled.\n\n\n`))
}
}
}
buildLibrary(LIBRARY_ARRAY)
2. 在package.json -> scripts中增加
“build:library”: “node build/build-library.js”
3. 配置文件: build/library.config.js
const path = require('path')
// const webpack = require('webpack')
const CompressionWebpackPlugin = require('compression-webpack-plugin')
const TerserPlugin = require('terser-webpack-plugin')
const productionGzipExtensions = ['js', 'css']
const resolve = dir => {
return path.resolve(__dirname, '..', dir)
}
module.exports = {
outputDir: 'production_dist',
publicPath: '/',
lintOnSave: true,
chainWebpack: config => {
config.resolve.alias
  .set('@', resolve('src')) // key,value自行定义,比如.set('@@', resolve('src/components'))
  .set('_c', resolve('src/components'))
  .set('_a', resolve('src/api'))
},
// 设为 false 打包时不生成.map 文件
productionSourceMap: false,
// Less 全局变量引入
pluginOptions: {
'style-resources-loader': {
  preProcessor: 'less',
  patterns: [resolve('src/assets/css/global.less')]
}
},
configureWebpack: {
devtool: 'source-map',
plugins: [
  new CompressionWebpackPlugin({
    algorithm: 'gzip',
    test: new RegExp(`\\.(${productionGzipExtensions.join('|')})$`),
    threshold: 10240,
    minRatio: 0.8
  }),
  // 限制只打一个包,不分Chunk
  // new webpack.optimize.LimitChunkCountPlugin({
  //   maxChunks: 1
  // }),
  new TerserPlugin({
    terserOptions: {
      warnings: false,
      compress: {
        drop_debugger: true, // console
        drop_console: true,
        pure_funcs: ['console.log'] // 移除console
      }
    }
  })
],
externals: {
  'vue-router': 'VueRouter',
  'view-design': 'iview'
},
module: {
  rules: [
    {
      test: /\.m?js$/,
      include: [
        resolve('src'),
        resolve('node_modules/view-design/src')
      ],
      use: {
        loader: 'babel-loader',
        options: {
          presets: ['@babel/preset-env']
        }
      }
    },
    { test: /\.(xlsx|xls)$/i, loader: 'file-loader' }
  ]
}
},
css: {
extract: false // css样式内联,不生成额外的css文件
}
}
## 参考文档


[http://v4.webpack.docschina.org/concepts/](http://v4.webpack.docschina.org/concepts/)


评论区